Monday, May 18, 2015

Where's the Value in Place Value?

I have a love-hate relationship with the New Math TEKS, as I'm sure many of you Math Educators can probably understand. Although, if I truly took your pulse, I'm willing to bet 'hate' would be the more dominant beat than love.

Well I love that the TEKS address the foundational and conceptual basis of Math (which in fact are NOT new at all, just new to us). I hate that there are little to no resources that really instruct teachers on how to disseminate the information to their students. But with the latter, I find it fun (call it the geek in me) to study different strategies and create in my mind the perfect classroom situation and centers for students to engage in to assist with their discovery of these understandings.

Big shout out to my 3rd grade teachers who are now helping students understand value of numbers to the hundred thousands place. Here's a few strategy and center ideas to help you out next school year! And if you happen to teach 4th grade, you may benefit from this as well.

The NEW TEK states:
3.2A (similar 4th grade TEK is 4.2A) -  Compose and decompose numbers up to 100,000 as a sum of so many ten thousands, so many thousands, so many hundreds, so many tens and so many ones using objects, pictorial models, and numbers, including expanded notation as appropriate.

3.2B (similar 4th grade TEK is 4.2B)- Describe the mathematical relationships found in the base-10 place value system through the hundred thousands place.

*Note the only difference in the 3rd and 4th grade TEKS are verbs and the place value focus.

STRATEGY IDEA: So, during your 15-20 minute mini-lesson, have your students sit in cooperative groups and work with a set of Base Ten Blocks (distribute up to 1 thousand block, 3 hundred flats, 5 ten longs and 10 units per group/pair-this should help you keep the numbers you compose/decompose within a certain range).

1. Give your students the task of creating a ten long using only unit cubes. Have them verbally express how we could write this in a number sentence. [They may say 1 + 1 + 1... = 10] Assist them in creating a multiplication number sentence (because up to this point they've only covered multiplication in the contextual sense, the multiplication symbol hasn't been introduced formally).


Verbal sentence: "1 group of 10 units = a 10 long" 
Number sentence: 1 x 10 = 10
 
 
2. Repeat facilitation of this task by having them line up the ten longs to see how many it takes to create a hundred flat; how many hundred flats stacked create a thousand block. Again, have them create a verbal sentence and corresponding number sentence.
 
3. Students can have a place value chart drawn in their journals. They can draw an arrow from the ones place to the tens place and label the arrow "10 times". Then draw an arrow from the tens place to the hundreds place labeled "10 times" and so on; to show that the progression from right to left across the place value chart is based on multiples of 10. Allow them to extend the pattern to the hundred thousands place.
 
 
4. Finally, demonstrate how to build a number (such as 324) and trade one of the hundred flats for 10 ten longs. Have them count to see if the value remains the same:
 
Say: "One hundred, two hundred, two hundred ten, twenty, thirty..., three hundred, three hundred ten, three hundred twenty, three hundred twenty-one, ....three hundred twenty-four)."
 
*This will help them grasp the concept of 'regrouping' when subtraction!!!
 
**Then see if they can discover other relationships; can they determine a relationship between the units and the hundred flat?
 
Verbal sentence: "10 groups of 10 units = a 100 flat"
Number sentence: 10 x 10 = 100
 
 
CENTER IDEA:
Materials: Number generators (dice), index cards with different numbers written on them, Place value disks.
 
 
Create numbers on index cards (or let students generate numbers using dice) in standard form up to the hundred thousand place. Have students build that number using place value disks or place value blocks.
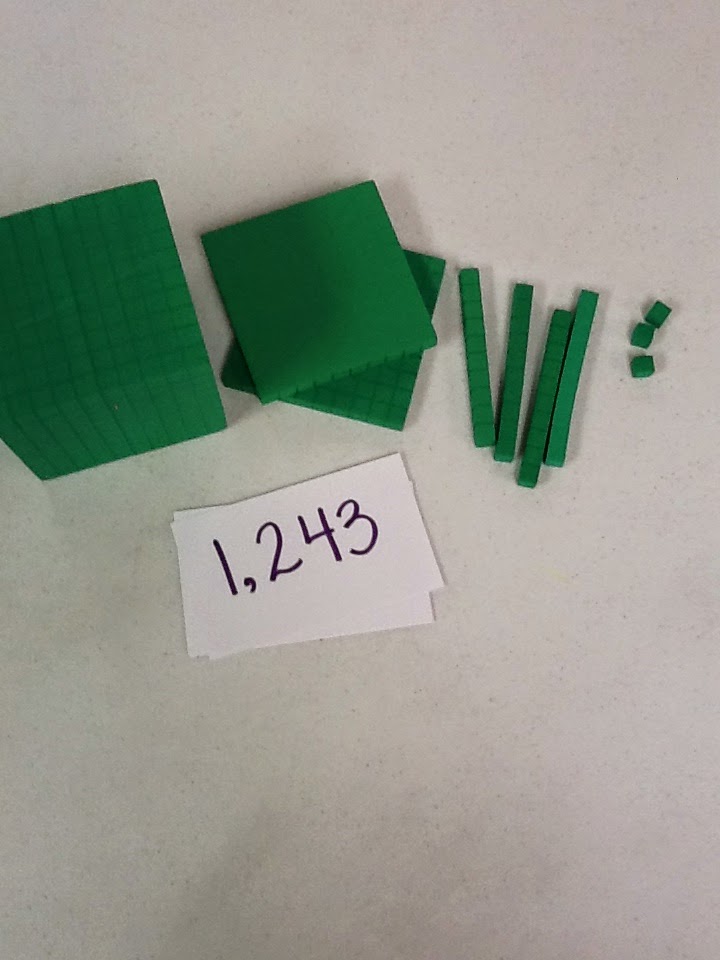


Students can then write the number in expanded notation.
(1 x 1,000) + (2 x 100) + (4 x 10) + 3 x 1)
 
What many don't know is that the standard implies that students must be able to represent the number in other ways. So have students trade out a place value (for its x 10 value equivalent) and rewrite the same numeral a different way.
 
 
Notice here how the thousand block has been traded for 10 hundred flats.
This makes a combination (total) of 12 (10 and 2) hundred flats.
So the new expanded form & notation, respectively, would be as follows:
 12 hundreds + 4 tens + 3 ones
(12 x 100) + (4 x 10) + (3 x 1)

 
OR
 
Notice here how one of the ten longs has been traded for 10 units.
This makes for a combination of 13 total units, which doesn't change the value of the number but does affect how its written:
1 thousand + 2 hundreds + 3 tens + 13 ones
(1 x 1,000) + (2 x 100) + (3 x 10) + (13 x 1)
 
 
Now ordinarily, I would advise one to use a center sheet so students can record their findings. Something like what you see below (but of course for larger numbers):


No disrespect for those types of sheets, I often use them! But I'm a bit of a "tree hugger" (I like to protect the number of copies I make) so I prefer dry erase boards (unless of course I'm collecting it for a grade). Then in that case, I would put to use the construction paper in my room and have students create a foldable and record their work on it, in chart form.
 

Can't wait for the Fall to roll around again so you guys can try this out and let me know how it works for your students! Happy Educating!


Thursday, May 14, 2015

Trick or Strategy?


I remember being in the classroom and prior to beginning a new unit, I would typically have a "pow wow" with my students about what we were about to learn and how it would be useful in their practical lives. As we entered the fraction unit and discussed how to compare fractions, I would always have a students shoot their hand up and yell out "I know! We can "Cross Multiply!"


And each time, my skin would crawl as my Cruella DeVille would rise up and say "No, we will NOT!" I would be infuriated that the kid wanted to use some lame trick to compare fractions." But I soon realized I couldn't be upset at the student. It was the 4th grade teacher I needed to spit venom at. They were making us 5th grade teachers work harder (we had to break the old, bad habit then teach a new habit) when really we should have been teaching the concept from a clean slate (or at least building on a foundational fraction concept).


Does "Cross Multiplication" work? Absolutely! But what does it really represent?
If students could not find a common denominator to turn both fractions into equivalencies, they could easily multiply the two denominators together (In the example above, they would get 75).
Then the numerator of both fractions, respectively, would be the product results of cross-multiplication. But this is a bit advanced for 3rd and 4th graders.

So what happens when teachers teach "Tricks" like "Cross Multiplication" is students lose conceptual understanding essential to their development in mathematical learning. They learn a trick but have no understanding of the "why" behind its' process. In actuality, they learn to be lazy and settle for a drive-thru junk food meals for a quick fix rather than wait for and feast on a home-cooked meal that won't only satisfy their craving, but provide nutritional value.

So what's the remedy? Learn the foundation for concepts yourself (even if it seems new to you).

First let's look at foundational progression of fractions.

Watch the progression:
3rd Grade- 3.3H "Compare two fractions having the same numerator or denominator in problems by reasoning about their sizes and justifying the conclusion using symbols, words, objects, and pictorial models.

4th Grade- 4.3D "Compare two fractions with different numerators and different denominators and represent the comparison using the symbols >, =, <.

Prior to the NEW TEKS this TEK progression applied to 4th and 5th grade, respectively.

 Students can understand fractions on a number line by relating Fraction tiles to number lines. Why? Because in previous grades (even in 3rd grade), the standard encourages open play with fraction tiles! LET.YOUR.STUDENTS.EXPLORE! Take the manipulatives off the shelves and let them build and create and make connections. They're capable!


Once students have grasped that (for example) three-thirds is equivalent to one whole they should be able to see and understand that one-third is close to zero, while two-thirds is closer to one whole. This leads to the understanding of "benchmark fractions"


Benchmark fractions can be seen and taught fairly quickly. Once students know 0, 1/2 (and its equivalencies) and 1 on a number line, they can justify which fractions are closer to zero, which are closer to half and those which are closer to 1 whole. This is more than half way to the learning expectation!!!

*Coach's note: What I would do is have my students build a blank number line. Then take a fraction tile (such as a fourth) off the tray and place it on the number line close to zero. Have them make a tick mark where the 1/4th tile ends. Continue this pattern until you reach 4/4ths = 1 whole.

Using the Number line as a basis, comparing then becomes feasible because students can plot two fractions on a number line or compare them both to benchmarks (five-sixths) would be closer to one whole (six-sixths) which is larger than, say, five-eighths because 5/8 is closer to four-eighths or one half.

Coincidentally, once students understand that the larger the denominator, the small the fractional piece (through exploration)...and vice versa, they will begin to compare fractions easily. They can justify that three-eighths is 3 small pieces, while one-half is 1 large very piece so one half MUST BE larger than three-eighths.

Now THAT'S strategy! And though it takes some doing (or developing) to get students to this point, their understanding goes a long way.

Ever wonder how students will use "cross multiplication" when they must compare (or "order" is the mathematical SE verb) three or more fractions? That's how you know the "Trick" you taught them, was unreliable.

Wednesday, April 22, 2015

STAAR is over...now what!?

Before you bring out the wine and pop bottles in triumphant celebration of making it through the week of testing, put your glass down and step away from the spirits.


I know, I know...you worked hard all year teaching your students concepts,strategies, how to use their reference chart and graph paper. You've labored over training students on pacing themselves and processing through rigorous word problems. You've fought the endless battle of "show your thinking" and wrestled with them on how important knowing their facts is to their ability to work problems with fluency. All to face this handful of boring days of 'actively monitoring', secretly hoping and praying they've listened to you and applied all those lessons! As the testing days end, you're as exhausted and nervous as they are and you did nothing but read lines from a testing administrators book and move around the room to ensure students were on task.


You deserve a break, right? After all, the curriculum has been tested and you did all you could do! The end is nigh!! So what about these final 6 weeks of school? What are they for? Recuperation it seems. I don't mean to throw salt in your bubbly, but you might want to consider a few things before you propose a toast.


1. Assessments aren't the end all-be all:
As educators, our commitment is to just that, education. Education doesn't merely begin nor end with an assessment. Assessments are an on-going evaluation that measure progress and prepare us for the next phase of learning. An effective teacher typically pre-assesses their kids in hopes to reveal what needs to be taught in the concept. Quizzes often serve as a midpoint measuring tool both for the student and teacher. Immediately following the concept, the teacher gives an assessment to chart growth. And the cycle repeats for each concept. But in the next unit, the teacher revisits the concepts from the previous unit and a best practice is including concepts on the new test, that the students didn't master from the test before.

2. Instructional days imply instruction:
A school calendar has at least 180 instructional days built in. Testing generally occurs by what?...like the 150th day or so, of those instructional days? Leaving roughly 30 instructional days remaining. The operative word here is 'instructional'. This calendar sets our standard to instruct students for the totality of 180 days and as we commit to our profession of teaching. our goal should follow suit.


3. Teach the child, not the test
I've heard of districts supporting the ideal of  'teaching to the test', justifying their beliefs with the claims that teachers are assessed based on how students perform. But, in my mind, there are cracks in that line of thinking. A teachers' salary, first of all, is way too low for their performance and worth to be determined merely by some scores on a test. A true teacher is passionate about the growth and progress of their students. Yes, we may have a particular craving for one subject matter over others, but when you watch a true teacher in action...you see more than someone drilling and killing strategies. You see deeper things occurring than just small group and center based instruction. You see engagement because the teacher has built repor and respect amongst their students. You see buy in from students who have grown accustomed to the safe culture of a classroom environment, all set by the teacher. You witness students who have learned to trust that their teacher believes in them, wants the best for them, and won't give up on them. And from this, students will perform at their best. No test can assess these things.

Finally, know this...curriculum never ends. Student must be prepared for rigor, depth of thinking, processing skills, and application of concepts. Post-testing, is the perfect time to repetitiously embed these skills because they will be used as the child is exposed to higher concepts in the next grade level. Those 30 stress-free days remaining give you the flexibility to review, remediate and grind those concepts home in a creative way. Now imagine the student looking back in years to come and appreciating the fact that they can understand their current content simply because their teacher never

gave up teaching after the STAAR. This powerful act confirms that their teachers' job was never about some test, it was about the passion they have for their craft.


Now, I will drink to that!

Sunday, February 8, 2015

Measurement Match It!

One of the the most powerful techniques to use in teaching is student prior knowledge through discourse and facilitation of learning. Below is a mini-lesson that can be facilitated by 4th grade teachers to introduce the following Student Expectation.

"Identify relative sizes of measurement units within the customary and metric systems." 4.8A


First lets look at the implication of the SE's verb.

Identify: this suggests that students simply need a point of reference to select from as it pertains to length, mass and volume.

Now, this SE is one that supports a readiness expectation wherein students must be able to solve problems in measurement that deal with conversion. In order to convert, however, students have to have a point of reference to help them know whether they are converting a larger unit into a smaller one and vice versa!

Materials: sentence strips, pictures of real life items, chart paper per group, markers per group

Facilitation Procedures:

1. With your students sitting in cooperative groups, distribute a sentence strip paper representing a source of measurement (length, mass, volume (in the customary or metric system) and a series of pictures that relate to each unit within that system. Give each group a different strip.


2. Have groups talk about which pictures match with which units. Encourage students to justify their answers with each other.

3. Once groups have matched each picture with its unit, have students record on their chart paper their reason for each match (with their marker).


4. Allow groups to get up, and rotate to another groups' table and analyze/critique their answers. Using a marker of a different color, encourage the group to either add their own justifications or change that groups answers and justify why.


5. Continue this rotation until all groups have visited each table and had a chance to discuss, analzye and prove (adjust) each of the systems of measurement.

The pictures for this activity can be found on the following website/blog site:

"Measurement Charts" are the freebies she provides!

This mini-lesson activity is great right before allowing students to break into their stations or centers and at your small group table it would be beneficial to help students underand this concept futher by facilitating deeper discussions and providing hands on exeriences like the following:

"Would the mass of a penny be best described as 4mg, 2.5mg or 0.5mg?" Then allowing students to measure (hands-on) that penny and justify why.

This type of exposure can be powerful in a station as well.

Thursday, February 5, 2015

Composite Perimeter with Cuisenaire Rods

I was meeting with one of my teachers about a new 4th grade TEK and as we were hashing out some ideas on creative ways to approach this TEK, I begin to think about some of the manipulatives on my shelf. One of the most under-used manipulative is the Cuisenaire Rods! #ButWhy?

It's possibly one of the most mysterious and misunderstood manipulative. After all they're just a lot of colored blocks of different sizes, right? WRONG! Actually, each block carries with it an undisclosed but very real value! Within this mysterious truth, there are varied numeration activities you can use to develop your students understanding.

  • Missing facts
  • Strip Diagram (models) for addition and subtraction
  • Exponential growth/patterns
...to name a few!

Today, I want to share my thoughts with you concerning the following 4th grade TEK (which is also echoed in 5th grade):

"Solve problems related to perimeter [and area] of rectangles where dimensions are whole numbers" 4.5D

"Represent and solve problems related to perimeter [and/or area and related to volume]."
5.4H

If you've taught 4th for any amount of years, you know perimeter has come a long way (in reference to how its tested). Back in the day, students were simply responsible for being able to calculate the distance around a regular shape (rectangle or square).

Now, irregular and composite shapes are part of the expectation as well.


So how do we assist students in utilizing the basic concept of "adding up all the sides" of a figure to find perimeter to apply it to a composite figure like the one above?

Well obviously there's the "sit & get" method. Teacher places a sample problem under the document camera (or projects it on the SmartBoard) and students watch the teacher demonstrate how to solve it!


But I'd like to submit that we not bore our students and more importantly that we present to them a more concrete approach to understanding and even figuring out a solution on their own. Will they struggle? Absolutely. But concrete understanding is more long term than memorizing.

So first, play with this model yourself until you're comfortable enough to present it to your students.

1. Pull those Cuisenaire rods from off your shelf (and dust them off) LOL!!


 2. Give each group or pair of students their own bag. Allow them to explore with the values by facilitating the following question:
"If a white square unit has a value of 1, can you determine the values of the other colored blocks?"
 
(Give them a few minutes to engage in math discourse with their partner(s) and develop their own methods for determining the values of the remaining blocks). *You may find that some students critically think by placing two colors together to determine the value of another. Others may line up various square units to find the value of a block...while some still may simply line them up by height*
 
Allow them an opportunity to share their groups' method.
 

3. After establishing the value of each, build your own composite figure. *Hint: Make sure you've determined ahead of time which blocks you will use in your example.


As you can see I have a total width of 10 (orange block) and a total length of 8 (brown block).

4. Here's where the critical thinking and thus the development of the concept will erupt!

Have students determine "which 2 (color) blocks might equal the length of the (10) orange block." *Hint: If need be, help them by suggesting they only look at the horizontal blocks first.


They should uncover that a blue block (6) is part of the length of the orange block (10) and a length of 4 (the purple block) is needed.


This concept will help them see part of their solution for solving a missing side is to add up the smaller sides that compose the longer side that runs the same direction. Facilitate this discussion with probing questions:

  • "What relationship did we see with the long block and the 2 shorter blocks?"
  • "What did all three blocks have in common?"
5. Have them try this same technique with the vertical sides of the composite figure.


If the brown block has a value of 8, which two blocks do we need to consider to find the compatible sides? (yellow and green)

You might ask:
  • "What are the values of the yellow and green block combined?"
  • "If the yellow block has a value of 5, what might be the value of the green block?"
6. Finally students can label the lengths of the blocks and calculate the perimeter of the composite figure.


Perimeter = 10 + 5 + 6 + 3 + 4 + 8 = 36 (units)


The following website has a great interactive lesson and activity to reiterate this strategy.
(click below)


I'd admonish teachers to work with students to develop a colorful anchor chart that visually stimulates students and gives them a point to refer back to.


A few final things:

1. This would make for an excellent hands-on mini-lesson prior to getting into a guided math or station rotation.

2. This may also suffice as the instruction you complete with your small group at your horseshoe (small group) table during Guided Math or station time.

3. Be sure that after handling the concrete models, you expose students to opportunities to demonstrate (represent) and solve this concept on paper. *As modeled in the anchor chart, I would even encourage use of colors in their drawings for your visual learners!

Let me know how it worked for you and your students! I welcome feedback!


Websites:
www.sohcahtoa.org.uk
www.pixshark.com


Tuesday, September 2, 2014

Takes a special man to marry an Educator


Attention shoppers! We have a special in the Educators department!

A few co-workers and I were talking about the type of men it takes to date and/or marry a woman who is in Education.

Why? Because unlike most jobs, Education is a profession where its employees are more than the clock-in/clock-out, 9 to 5 kind of workers. Oh no...those in this profession are overly passionate about what they do and those whom they serve. They physically clock-out, but are mentally clock-in around the calendar. They look forward to the opportunity to work from home, purchase resources from their own funds and utilize their vacation time to 'store up for winter' (create things for their classrooms).


So what type of men are needed for this special breed of women? Well, in short the kind of men who:

1. Don't mind touching their woman's feet. That's right I said it. Educators are often on their feet ALL THE LIVE LONG DAY...and it would benefit him to have some greased up hands ready to massage the tension out of his wife's feet at least 3 times a week.

2. Don't mind being a receptacle for brain dumping. When an educator comes home, we have stories for days. Stories about co-workers, stories about kids, stories about work load...and well sometimes we just need someone who is willing to listen to the monotony of our stories be they juicy or mundane. Now, should we let you in on what a student or co-worker said/did that offended us, we can't have you going all POSTAL on them, just listen and act shocked, nod and keep listening. We just need a venting mechanism.

Finally, and probably most important...

3. Don't mind being #teamEducator. All this means is, you MUST understand that we may or may not work waaay beyond normal work hours. It doesn't mean we are cheating on your or can't stand being around you...it simply means we find the hours after our students have left as the MOST PRODUCTIVE TIME OF DAY!! Be patient, once the year gets going, we'll have it down to 1-2 late days a week. Just fix dinner and be ready to massage those feet!

This also means don't be too manly to get in the game. That's right, you can help cut out some lamination while you're watching the game. You may even be called on to grade some papers; grab that red pen, the answer key and get to markin'! You ain't too good for the task! And should she need someone to help move her in (or out of) her classroom, be ready to stand on a step ladder to hang border and build shelves. Go ahead and factor it into the budget that she will spend a portion of her own money on her students.

All I'm saying guys is...it takes a special man...an understanding man. One who can handle having not only a wife, a mother for your children, but a woman who secretly wears an S on her chest because she works with OTHER PEOPLE'S KIDS and she can't whoop them. For that alone, she deserves much more!


If you're married to an Educator or dating someone who is, I just gave you a huge discount!
If you're single and still looking...steer clear of this aisle, or use your coupon to cash in; you're gonna need it!

Monday, July 28, 2014

Students are teachers too!


Are you beginning to get that 'itch'? You know the signs:
You can't stop thinking about how to decorate your class;
You start gathering ideas from Pinterest;
(if you're like me) You begin having dreams related to your classroom.

Well as you prepare to go back here's a little encouragement. Now this advice is going to be pretty subjective but it stems from my personal study of the NEW Math TEKS. This summer, I’ve dedicated and budgeted a few hours each week to study grade by grade the New Math TEKS and familiarize myself with the expectations of students as we transition from what students were expected to know into what they’re going to be held accountable for this coming year.

In reflection, a gap is going to transpire and although that’s inevitable; it’s written in the fine print of our contracts that we are expected to close this gap. Hopefully, however, it’s also written on the Oaths of our hearts as educators to accomplish this feat.

So here’s how I am challenged to motivate my teachers…and hopefully how you are challenged to motivate yourself as you seek to empower your students:

1. Know what your students SHOULD know.

This includes unlearning what you “know” to a degree. We all bring to the table that good ole’ “I didn’t learn it this way” attitude when we approach teaching our students. And often times that hinders us from the opportunity to facilitate a diverse approach to learning for our students. What I love about Math is that there are various roads to one solution. Let your students explore and come to that realization. More conclusively, become a student of your TEKS (those you’re responsible to teach as well as what your student learned in the previous grade and what they will learn in the upcoming grade). But more specifically what they’re held accountable for in their current grade. Nothing more, nothing less.

2. Assess what they DO know.
 
Be creative in facilitating pre-assessments. This doesn’t have to be formative and long assessments. This can be quick “exit ticket” like questions or even fun warm-ups. This will help you not only get a feel for the diversity in your classroom (which will drive the differentiation in your classroom) but also help you know where to start teaching the curriculum. Make no assumptions. Though you and your team may teach the same subject, you all have different training, backgrounds and teaching styles. This is true of your students as well. They learn differently, and were taught different things. Assess to kill assumptions.

3. Facilitate closing the gap (between what you know they SHOULD know and what they DO know) by drawing on their knowledge and stretching it towards the goal.

Finally, contrary to popular belief you are NOT the KNOW IT ALL simply because you are the teacher. Trust that your students can unveil the truths in the curriculum, if you stretch them towards that end. This moves you from TEACHER to FACILITATOR. Letting your students struggle, correcting their misunderstandings and cooperative group exploration will practically cause them to understand what it is they should know. Your job is to provide environments and situations that promote this type of discovery; encourage them along the way (even in failure); and be patient with the process.

These are all things I’ve stumbled upon in my years in the classroom; yet they are also truths I’m learning to trust as my students have now become teachers! Happy School Year to you and yours!